Why True Core Strength Begins Off the Saddle
A horse does not have a bony collarbone connecting the forelimbs to the trunk. Instead, the ribcage is suspended between the front limbs by a network of muscles, fascia, ligaments, and connective tissues known collectively as the thoracic sling. This arrangement gives the shoulder considerable freedom, but it also means that the horse must actively support and lift the thorax through muscular control. The quality of that support influences balance, stride length, shock absorption, posture, and the way the back receives load.
That matters before a saddle is placed on the horse, and even more before a rider climbs aboard. A weak or poorly coordinated horse may respond to weight by hollowing the back, bracing the underside of the neck, tightening the shoulder muscles, and shifting more load onto the forehand. A saddle fitted to that temporary, collapsed shape can then create uneven panel contact, bridging, rocking, or pressure behind the scapula. For practical saddle guidance, sound saddle-fit principles must be applied to the horse’s actual back shape, not to a hoped-for outline.
The objective of unmounted groundwork is not to force a picturesque head carriage. It is to teach the horse to organize the trunk from the inside out. Correct exercises invite the serratus ventralis, pectoral muscles, rhomboideus, abdominal chain, and hindquarters to share the work. The horse should gradually learn to lift the base of the neck, keep the back available to move, and place the hind limbs beneath the body without rushing. This is the foundation for carrying power and for a saddle that remains comfortable as the musculature develops.
Anatomy of the Thoracic Sling and the Perils of Gadgetry
The thoracic sling is not one isolated muscle. The serratus ventralis helps suspend the thorax from the forelimbs and contributes to lifting the withers. The pectorals help stabilize and move the forelimbs, while the rhomboideus draws the shoulder region toward the trunk and supports the connection between the neck, scapula, and ribcage. Trapezius, latissimus dorsi, and several muscles of the neck and shoulder also contribute to coordinated movement. When these structures work in sequence, the horse can elevate the trunk between the forelimbs while allowing the scapula to rotate freely.
That dynamic self-carriage is very different from a head-down posture produced by restrictive equipment. Draw reins and excessively tight side reins may place the head and neck in a visually contained position without creating genuine thoracic lift or abdominal support. A horse can appear round while the back remains tense, the steps become short, and the underside of the neck does the work that should be shared by the trunk. Equipment that limits escape rather than teaching balance can hide the warning signs of weakness.
Groundwork should therefore be progressive, observable, and easy to discontinue when the horse loses rhythm. Veterinary research supports a cautious interpretation of mobilization work. A systematic review of veterinary mobilization techniques found positive outcomes across the included studies, but also noted substantial variation in methods, dosage, outcome measures, and study quality. The useful lesson is not that every mobilization exercise is automatically therapeutic. It is that targeted movement should be selected carefully, introduced gradually, and adjusted with veterinary or rehabilitation input when pain, lameness, or a known back problem is present.
- Look for active support: the base of the neck widens, the withers feel less dropped, and the horse continues to breathe and swing through the back.
- Reject forced shape: a tucked nose, tight jaw, or exaggerated neck curve is not proof of abdominal engagement.
- Progress in small doses: short repetitions with frequent pauses are safer than long sessions that produce fatigue and bracing.
- Investigate discomfort: resistance, tail swishing, uneven steps, or sudden changes in posture require assessment rather than stronger equipment.
Selecting and Fitting the Workshop Cavesson for Groundwork
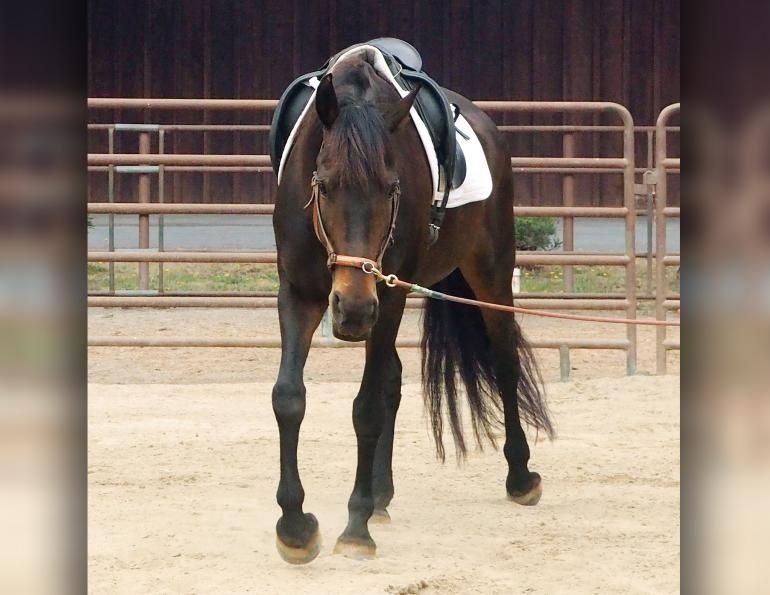
For precise in-hand work, a stable leather cavesson is usually more useful than a loose webbing halter. A cavesson places communication around the nose and can provide a consistent point from which to guide flexion, positioning, and straightness. A webbing halter is lightweight and convenient for leading, but it may rotate or slide when lateral pressure is applied. A bit can offer fine communication, yet it introduces pressure inside the mouth and is unnecessary for many rehabilitation and basic postural exercises. The correct choice depends on the horse, the handler, and the task, but stability and comfort should come before refinement.
The noseband should sit above the flexible nasal cartilage, on the firm bony portion of the nasal bones, with enough clearance to avoid pressure on the nostrils. It must be snug enough not to roll under rein or lead-line pressure, but never so tight that breathing, swallowing, or normal jaw movement is restricted. Check the throat and jaw area as well. A cavesson that shifts toward the eye, pinches behind the cheekbone, or pulls unevenly from one side is not a precise tool, regardless of its leather quality.
Construction details matter in daily stable use. Good leather should be supple without feeling spongy, with clean edges, secure stitching, and hardware that lies flat. A padded nosepiece can improve comfort, but padding does not correct poor geometry. Before every session, inspect the holes, buckles, rings, and cheek straps. Leather should be cleaned of sweat and grit, conditioned lightly when dry, and stored away from damp bedding and direct heat. Excess oil can soften the structure and encourage stretching, which eventually reduces stability.
| Cavesson style | Strengths | Points to check |
|---|---|---|
| Traditional leather cavesson | Stable, durable, and clear in lateral communication | Correct nose position, even padding, sound stitching, and regular leather care |
| Webbing halter | Light, inexpensive, and convenient for leading | Risk of rotation, narrow pressure points, and reduced precision during lateral work |
| Bit and bridle | Detailed rein communication for trained horses | Requires appropriate bit fit, educated hands, and a genuine reason for mouth pressure |
A cavesson should never be used to manufacture a fixed outline. Its job is to make a small, clear request while the horse remains able to move the jaw, poll, neck, and shoulders. If the horse leans heavily into it, becomes anxious, or loses forward rhythm, reduce the demand and reassess the fit. Precision is only useful when the horse can answer without discomfort.
In-Hand Lateral Work to Free the Scapula and Engage the Abdomen
Begin in a quiet, enclosed area with the horse walking forward on a loose, safe line. Shoulder-fore is an excellent starting point because it asks the horse to place the shoulders slightly to the inside while the hindquarters remain on the track. The movement should be shallow, measured, and performed for only a few steps before returning to straightness. The purpose is to encourage the inside hind leg to step under the body and to help the outside shoulder remain organized, not to create a dramatic angle.
- Walk forward in a clear rhythm and establish straightness before asking for lateral positioning.
- Position the shoulders only slightly inside the track, using the cavesson or lead line for direction and the handler’s body position to support forward movement.
- Take three to five controlled steps, then straighten and allow the horse to walk freely.
- Repeat on the opposite rein, keeping the number of repetitions equal and stopping before fatigue appears.
- Introduce a gentle travers only after shoulder-fore is reliable, asking the quarters slightly inward while maintaining forward travel and a soft bend.
Genuine thoracic lift is visible in several small details. The base of the neck may look broader as the horse lifts the trunk between the forelimbs. The triceps area should appear less fixed, and the shoulder should glide rather than swing outward. The inside hind leg should step toward the center of mass without the horse rushing, swinging the haunches away, or collapsing through the ribcage. A low head alone is not a sufficient marker, and excessive neck flexion can conceal a hollow back.
Precise lateral flexion can recruit stabilizing muscles through the trunk, but it must remain controlled. Research on spinal mechanics and muscle activation provides useful biomechanical context in this area through an authoritative study of spinal movement and stabilization. In practical terms, a small bend with steady walking is more productive than a deep bend held against resistance. If the horse loses rhythm, braces through the jaw, or steps short, return to straight lines and rebuild the response.
Structured Polework Configurations for Proprioception and Lift
Ground poles can encourage the horse to organize the limbs, lift the feet, and coordinate the trunk, but they are not automatically strengthening. A horse that is hurried over poles may flatten the back, rush the shoulders, and lose the very abdominal control the exercise is intended to develop. Start with one or two poles in walk on a straight line. Allow enough time for the horse to look, step, and recover balance. The handler should maintain a regular pace rather than driving the horse at the obstacle.
- Walk rails: begin with poles spaced for the individual horse’s comfortable walk, then adjust only one variable at a time.
- Fan pattern: use a broad fan to vary the distance between the feet, encouraging accuracy and controlled bending.
- Alternating raised ends: raise one end slightly, then alternate sides on later repetitions to ask for careful joint flexion without creating a large jump.
- Short grids: introduce several poles only when the horse can remain rhythmic over a single pole in both directions.
Published polework guidance commonly gives approximate distances for walk, trot, and canter exercises, but no measurement suits every horse. Height, limb length, stride style, fitness, footing, and the horse’s current strength all change the correct spacing. For an average-sized horse, begin conservatively and watch the feet. Reaching, stumbling, repeated touching, or rushing means the distance or complexity is wrong. The pole should invite a better step, not force a difficult one.
Handler position is equally important. Walking too far ahead can pull the horse onto the forehand, while trailing behind can create hurried steps. Keep the line organized, maintain a safe position beside the shoulder, and allow the horse to carry its head naturally. Sessions should be short, perhaps several repetitions on each rein with generous walking breaks. Polework is demanding for an unconditioned horse, so recovery days and variation with plain walking, gentle backing, or quiet lateral steps are part of the programme.
Reassessing the Back Before Reintroducing the Saddle
Before mounting, evaluate the horse in movement and at rest. Look for a more developed, even thoracic trapezius and a smoother transition from the withers into the back. The area behind the scapula should not show a pronounced hollow that disappears only when the horse is held in a frame. Palpate with calm, even pressure along the back and girth region, comparing both sides. Heat, swelling, flinching, muscle guarding, or a sudden change in attitude warrants professional assessment rather than further conditioning.
Muscle development can change saddle fit. As the thoracic sling and topline improve, the horse may become broader through the withers and behind the shoulder. A saddle that was acceptable on a narrow, deconditioned back may then sit differently, make uneven contact, or restrict the scapula. Tree width, panel balance, channel clearance, and flocking must be reassessed. The saddle must clear the spine throughout movement and distribute pressure broadly; a fixed finger-width rule cannot replace a practical fit assessment on the moving horse.
A cautious four-week progression can provide structure, although pain, veterinary restrictions, age, and previous workload may require a slower plan.
- Week one: use active walking, straight lines, gentle backing, and one or two simple poles for approximately 15 to 20 minutes, with rest days between more demanding sessions.
- Week two: add short shoulder-fore repetitions on both reins and a shallow fan, while preserving a relaxed walk and frequent pauses.
- Week three: combine brief lateral sequences with a small pole line, slightly raised at one end if the horse remains rhythmic and confident.
- Week four: reassess posture, palpation responses, movement quality, and cavesson or saddle fit. If the horse remains comfortable, introduce the saddle for unmounted walking first, then seek qualified guidance before adding rider weight.
Carrying power is built through repetition, not restraint. A well-fitted cavesson, thoughtful pole spacing, accurate lateral work, and careful observation give the horse a chance to develop the thoracic sling without hiding weakness behind a forced outline. The saddle should return only when the horse can lift and stabilize the trunk in its own movement, because long-term comfort depends on the strength and coordination underneath the equipment.